
 24/7 Emergency Service
DIY Table Top Stain by Bella
3/27/2020 (Permalink)
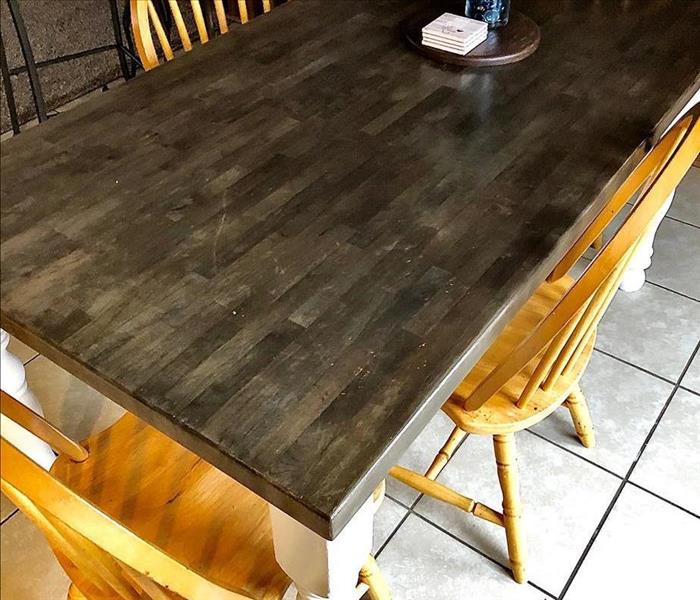 DIY Tabletop Stain Final Results
We’ve had this table for a while now. It’s an oak butcher block top, and honestly pretty great.
But I really REALLY didn’t like the orange-like color of it. Like, at all. So, I decided to change that.
However, it was the middle of the winter when I decided this, and you can’t stain a table outdoors in the middle of the winter. And I couldn’t do it indoors and expose my little kiddos to the fumes. And I definitely didn’t want to wait until it warmed up enough outside to do this!
So, I decided to make my own non-toxic stain. Yes, a DIY stain.
Have I lost my mind? Maybe a little! But I made it and.... it worked! Like magic!
I wanted a beautiful, old and weathered gray look with a hint of warm brown peeking through and that’s EXACTLY what I got. The color is perfect. I absolutely love the results!
So how the heck did I do it? You’re going to love this. It’s so easy and extremely cheap! Plus, you probably already have all these items in your house right now.
Disclaimer: You may love these results and its’ cost effectiveness so much that you may start finding new house projects just to use this stain.
You will need:
- 1 jar with a lid
- 1 ball of steel wool (no soap products on it)
- White vinegar
- Strong, steeped black tea
- 2 wash cloths
How to make the stain:
- Take the steel wool ball and break it in half (or as close to half as possible), and then rip that half into smaller pieces, placing the pieces in the empty jar. So, you should have roughly half the steel wool ball in the jar.
- Pour vinegar over the steel wool until the steel wool is covered.
- Place the lid on the jar and let it sit for at least 24 hours before use.
THAT’S IT. Super easy right? The hardest part about this stain is waiting the 24 hours to use it! This allows the vinegar to become ironized from the steel wool, which interacts with the wood tannins, making your wood a darker color. Now, the longer you leave the steel wool in there, the darker it can make the wood. So experiment if you’d like! The possibilities are endless.
Okay, now to apply the stain! Keep in mind that your wood project should be stripped of any pre-existing finishes/stains.
- Your stain has sat for at least 24 hours. You can now remove the steel wool from your jar or strain it out if you have smaller bits. (To test the color of your stain, take a scrap piece of wood and follow these next steps before trying on the final piece you want to stain. This way, if you want it to be darker, you put the steel wool back in for a few more hours. Just know: the stain will continue to change shades for a few hours after application.)
- Take your strong black tea and use a washcloth to apply a liberal amount to the wood you’d like to stain. Allow to soak in and dry.
- Once the tea has dried, use a separate washcloth to apply the stain to the wood. It should immediately darken the wood on contact and will continue to change in shade a bit more over the next few hours. (This is fascinating to watch, actually.)
- Protect the surface from use for at least 24 hours to ensure that it is fully dried and to its’ final shade. You may now seal your piece in whatever finish product you prefer.
So, there you go! The secret to a non-toxic stain that works in one application! I actually applied this to our table while holding our infant! It basically just smelled like vinegar with a hint of metal- very much tolerable.
If you try this out, share a picture with us! We’d love to see what projects you’re working on and how this turned out for you.